Monogramming and Embroidering; PREPARING FOR MONOGRAMMING AND EMBROIDERING; Monogrammes et broderies; Monogramas y bordados; Выстрачивание монограмм и вышивание - Brother LS-3125 - Manual de uso - Página 44


Índice:
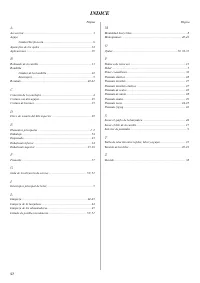
- Página 5 – INDICE; СОДЕРЖАНИЕ
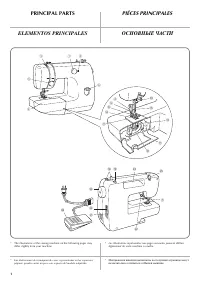
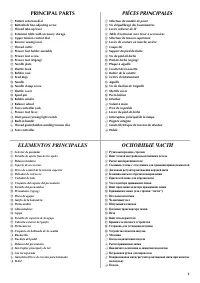
- Página 6 – PRINCIPAL PARTS; PIÉCES PRINCIPALES; ELEMENTOS PRINCIPALES; ОСНОВНЫЕ ЧАСТИ
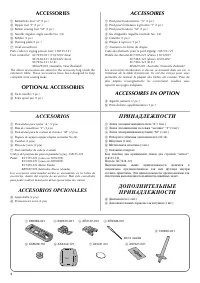
- Página 8 – ACCESSORIES; OPTIONAL ACCESSORIES; ACCESSOIRES; ACCESSOIRES EN OPTION; ACCESORIOS OPCIONALES; ДОПОЛНИТ Е ЛЬНЫ Е
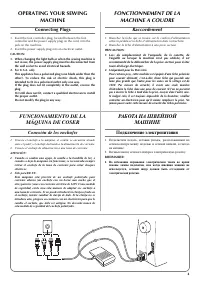
- Página 9 – Connecting Plugs; FONCTIONNEMENT DE LA; Raccordement; FUNCIONAMIENTO DE LA; Conexión de los enchufes; РАБОТА НА ШВЕЙНОЙ; Подключение электропитания
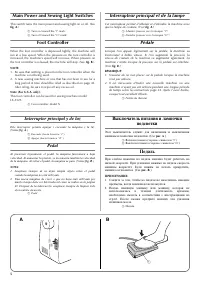
- Página 10 – Main Power and Sewing Light Switches; Foot Controller; Interrupteur principal et de la lampe; Interruptor principal y de luz; Выключатель питания и лампочки
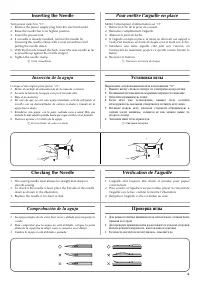
- Página 11 – Inserting the Needle; Checking the Needle; Pour mettre l’aiguille en place; Vérification de l’aiguille; Comprobación de la aguja; Установка иглы; Проверка иглы
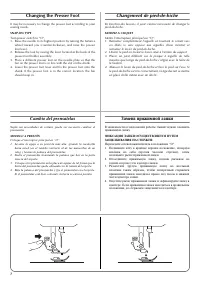
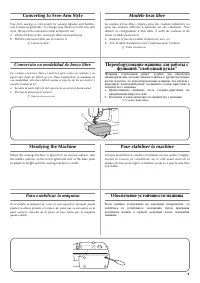
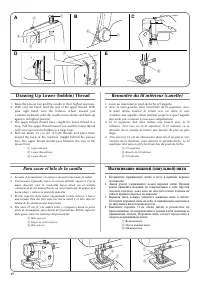
- Página 13 – Converting to Free-Arm Style; Steadying the Machine; Modèle bras libre; Pour stabiliser la machine; Para estabilizar la máquina; Переоборудование машины для работы с; Обеспечение устойчивости машины
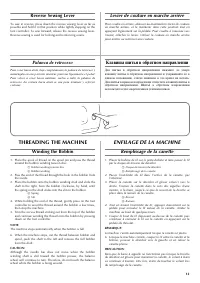
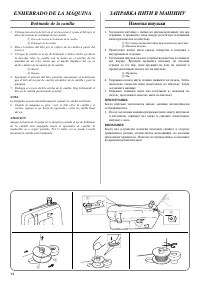
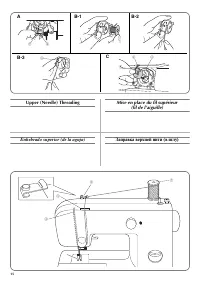
- Página 17 – ENHEBRADO DE LA MÁQUINA; Bobinado de la canilla; ЗАПРАВКА НИТИ В МАШИНУ; Намотка шпульки
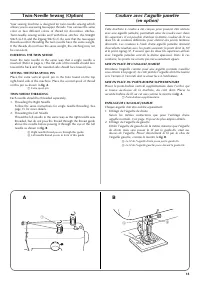
- Página 23 – УСТАНОВКА ДВОЙНОЙ ИГЛЫ; ЗАПРАВКА ДВОЙНОЙ ИГЛЫ НИТЬЮ
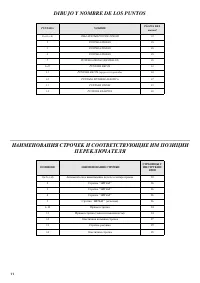
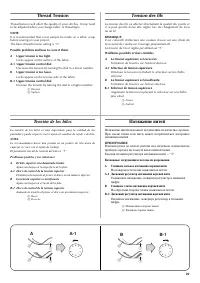
- Página 24 – Thread Tension; Tension des fils; Tensión de los hilos; Натяжение нитей; Возможные затруднения и методы их разрешения.; A-1 Дисковый регулятор натяжения верхней нити; B-1 Дисковый регулятор натяжения верхней нити
- Página 25 – Слишком слабое натяжение нижней нити.
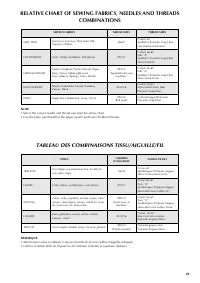
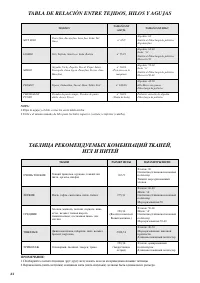
- Página 27 – TABLA DE RELACIÓN ENTRE TEJIDOS, HILOS Y AGUJAS; ТАБЛИЦА РЕКОМЕНДУЕМЫХ КОМБИНАЦИЙ ТКАНЕЙ,
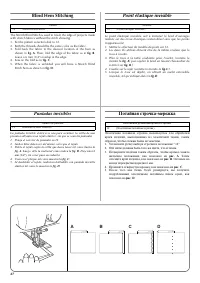
- Página 31 – Blind Hem Stitching; Point élastique invisible; Puntadas invisibles; Потайная строчка-мережка
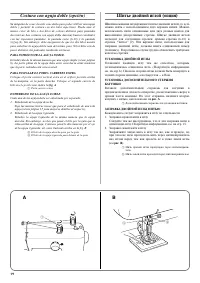
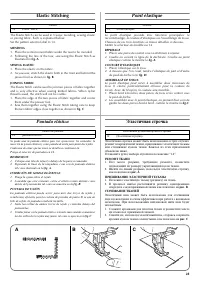
- Página 32 – Elastic Stitching; MENDING; SEWING ELASTIC; JOINING FABRIC; Point élastique; Puntada elástica; Эластичная строчка; РЕМОНТ ТКАНИ; ПРИШИВАНИЕ ЭЛАСТИЧНОЙ ТЕСЬМЫ; СТАЧИВАНИЕ ТКАНЕЙ
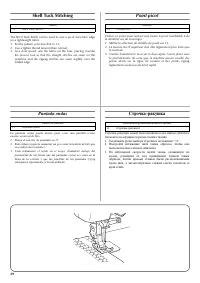
- Página 33 – Shell Tuck Stitching; Point picot; Puntada ondas
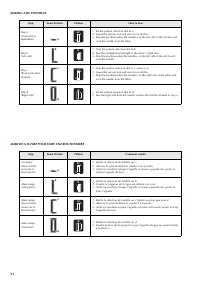
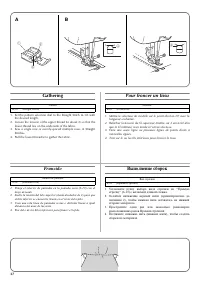
- Página 34 – Making a Buttonhole; MAKING A BUTTONHOLE; Création d’une boutonnière; Para coser ojales; Выметывание петель
- Página 36 – ВЫПОЛНЕНИЕ ВЫМЕТЫВАНИЯ ПЕТЕЛЬ
- Página 37 – ЗАКРЕПЛЕНИЕ СТРОЧКИ И ПРОРЕЗКА ПЕТЛИ
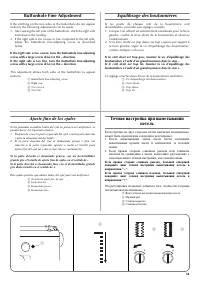
- Página 38 – Buttonhole Fine Adjustment; Equilibrage des boutonnières; Ajuste fino de los ojales; Точная настройка при выметывании
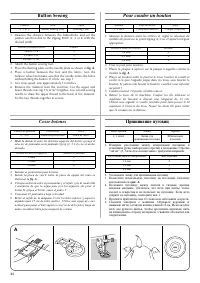
- Página 39 – Button Sewing; Pour coudre un bouton; Coser botones; Пришивание пуговиц
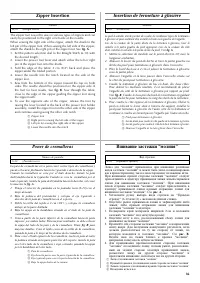
- Página 40 – Zipper Insertion; Insertion de fermeture à glissière; Poner de cremalleras; Вшивание застежки “молния”
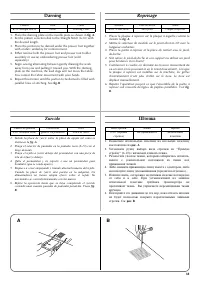
- Página 41 – Gathering; Pour froncer un tissu; Fruncido; Выполнение сборок
- Página 44 – Monogramming and Embroidering; PREPARING FOR MONOGRAMMING AND EMBROIDERING; Monogrammes et broderies; Monogramas y bordados; Выстрачивание монограмм и вышивание
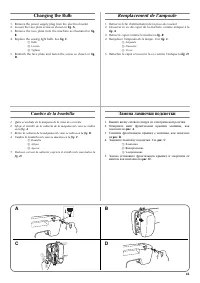
- Página 46 – Changing the Bulb; Remplacement de l’ampoule; Cambio de la bombilla; Замена лампочки подсветки
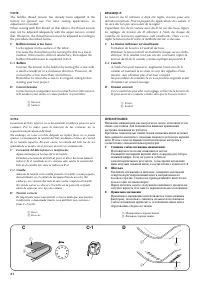
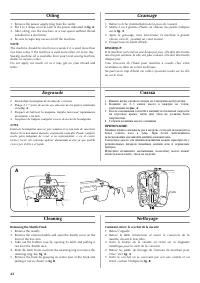
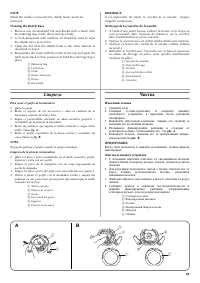
- Página 48 – Cleaning the Shuttle Race; Limpieza; Чистка; Извлечение челнока
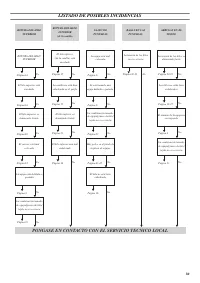
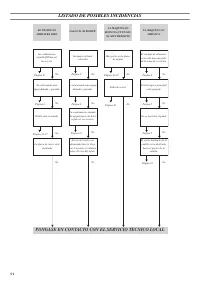
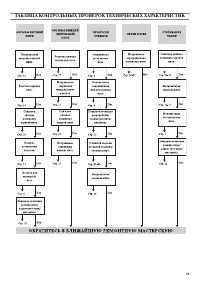
- Página 49 – Cleaning the Feed Dogs; Performance Checklist; Liste de vérification en cas de; Listado de posibles incidencias; Очистка гребенок транспортера; Таблица контрольных проверок
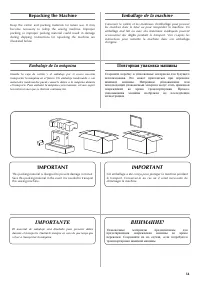
- Página 54 – Repacking the Machine; Emballage de la machine; IMPORTANT; Embalaje de la máquina; IMPORTANTE; Повторная упаковка машины
40
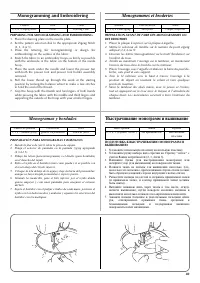
Monogramming and Embroidering
PREPARING FOR MONOGRAMMING AND EMBROIDERING
1. Place the darning plate on the needle plate.
2. Set the pattern selection dial to the appropriate Zigzag Stitch
(2, 3, 4 or 5).
3. Draw the lettering (for monogramming) or design (for
embroidering) on the surface of the fabric.
4. Stretch the fabric in an embroidery hoops as firmly as possible
with the underside of the fabric on the bottom of the inside
hoop.
5. Place the work under the needle and lower the presser bar
with both the presser foot and presser foot holder assembly
removed.
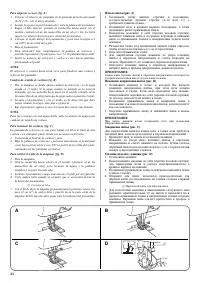
6. Pull the lower thread up through the work at the starting
position by turning the balance wheel to make a few stitches
to hold the end of the thread.
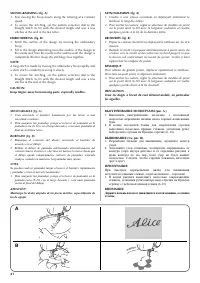
7. Grip the hoop with the thumb and forefingers of both hands
while pressing the fabric with the middle and third fingers and
supporting the outside of the hoop with your smaller fingers.
Pattern
Foot
Other
2, 3, 4, 5 (Zigzag Stitch)
None
Darning Plate
Monogrammes et broderies
PREPARATION AVANT DE FAIRE DES MONOGRAMMES OU
DES BRODERIES
1. Placer la plaque à repriser sur la plaque à aiguille.
2. Mettre le sélecteur de modèle sur le numéro de point zigzag
adéquat (2,3,4 ou 5).
3. Dessiner les lettres (monogrammes) ou le motif (broderies) sur
l’endroit du tissu.
4. Tendre au maximum l’ouvrage sur le tambour, en maintenant
l’envers du tissu dans le fond du cercle intérieur.
5. Placer l’ouvrage sous l’aiguille et abaisser la barre du pied-de-
biche, sans pied et sans support.
6. Tirer le fil inférieur vers le haut à travers l’ouvrage à la
position de départ en tournant le volant et faire quelques
points de maintien.
7. Saisir le tambour des deux mains, avec le pouce et l’index,
tout en appuyant sur le tissu avec le majeur et l’annulaire de
chaque main. Les auriculaires serviront à tenir l’extérieur du
tambour.
Modèle
Pied-de-biche
Autre
2, 3, 4, 5 (Point zigzag)
Sans pied
Plaque à repriser
Monogramas y bordados
PREPARACIÓN PARA MONOGRAMAS Y BORDADOS
1. Instale la placa de zurcir sobre la placa de agujas.
2. Ponga el selector de puntadas en la puntada zigzag apropiada
(2,3,4 ó 5).
3. Dibuje las letras (para monogramas) o el diseño (para bordados)
en el derecho del tejido.
4. Estire el tejido en el bastidor tanto como pueda y si es posible con
el revés abajo del círculo interior.
5. Coloque la tela debajo de la aguja y baje la barra del prensatelas,
aunque no haya ningún prensatelas o soporte puesto.
6. Girando la ruedecilla, pase el hilo inferior por el tejido donde
quiera empezar y cosa unas puntadas para asegurar el extremo
del hilo.
7. Sujete el bastidor con el pulgar e índice de cada mano, presione el
tejido con los dedos medios y anulares y aguante los exteriores del
bastidor con los meñiques.
Número de puntada
Prensatelas
Otros
2, 3, 4, 5 (Puntada zigzag)
Quitarlo, sin prensatelas
Placa de zurcir
Выстрачивание монограмм и вышивание
ПОДГОТОВКА К ВЫСТРАЧИВАНИЮ МОНОГРАММ И
ВЫШИВАНИЮ
1. Установите штопальную пластину на игольную пластину.
2. Установите ручку выбора вида строчки на Строчку “зигзаг” с
учетом Ваших потребностей (2, 3, 4 или 5).
3. Напишите буквы (для выстрачивания монограмм) или
начертите узор (для вышивания) на поверхности ткани.
4. Натяните ткань на пяльцы для вышивания настолько туго,
насколько это возможно, причем нижняя сторона ткани должна
быть обращена к нижней стороне внутреннего кольца пялец.
5. Разместите пяльцы под иглой и стержнем прижимной лапки
(и прижимная лапка, и адаптер прижимной лапки должны
быть сняты).
6. Вытяните нижнюю нить через ткань в том месте, откуда
начнёте вышивание, путём поворота маховика машины и
выполните несколько стежков для закрепления конца нити.
7. Зажмите пяльцы большим и указательным пальцами обеих
рук, одновременно прижимая ткань средними и
безымянными пальцами и поддерживая внешнюю
поверхность пялец мизинцами.
Вид строчки
Лапка
Прочее
2, 3, 4, 5 (Строчка “зигзаг”)
Не применяется
Штопальная
пластина
"Cargando la instrucción" significa que debes esperar hasta que el archivo se cargue y puedas leerlo en línea. Algunas instrucciones son muy grandes y el tiempo de carga depende de la velocidad de tu conexión a Internet.
Resumen
INDICE Página ELEMENTOS PRINCIPALES ......................................................... 1ELEMENTOS PRINCIPALES ......................................................... 2ACCESORIOS.................................................................................... 3FUNCIONAMIENTO DE LA MÁQUINA...
1 PRINCIPAL PARTS * The illustrations of the sewing machine on the following pages may differ slightly from your machine. PIÉCES PRINCIPALES * Les illustrations représentées aux pages suivantes peuvent différer légèrement de votre machine à coudre. ELEMENTOS PRINCIPALES * Las ilustraciones de la máq...
3 ACCESSORIES a Buttonhole foot “A” (1 pc.) b Zipper foot “I” (1 pc.) c Button sewing foot “M” (1 pc.) d Needle (regular single needle No. 14) e Bobbin (1 pc.) f Darning plate (1 pc.) g Oval screwdriver Parts code for zigzag presser foot: 138135-121Foot controller: XC7359-021 (110/120V Area) XC7438-...
Otros modelos de máquinas de coser Brother
-
 Brother JS-23
-
 Brother LS 2150
-
 Brother LS-1520
-
 Brother LS-2125
-
 Brother SL-7
-
 Brother SM2700
-
 Brother ST4031HD
-
 Brother X-5