Brother LS-3125 - Manual de uso - Página 20


Índice:
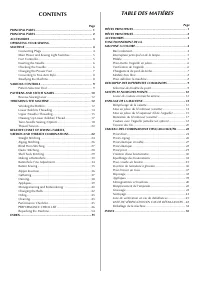
- Página 5 – INDICE; СОДЕРЖАНИЕ
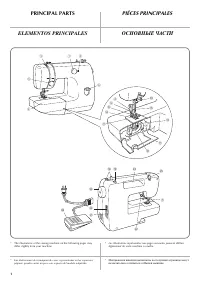
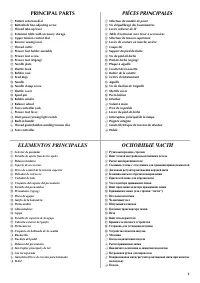
- Página 6 – PRINCIPAL PARTS; PIÉCES PRINCIPALES; ELEMENTOS PRINCIPALES; ОСНОВНЫЕ ЧАСТИ
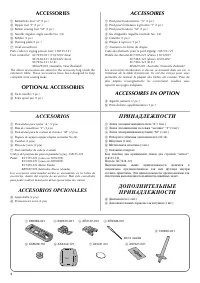
- Página 8 – ACCESSORIES; OPTIONAL ACCESSORIES; ACCESSOIRES; ACCESSOIRES EN OPTION; ACCESORIOS OPCIONALES; ДОПОЛНИТ Е ЛЬНЫ Е
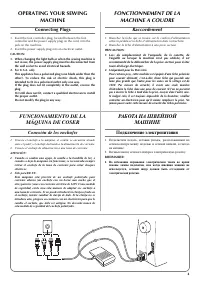
- Página 9 – Connecting Plugs; FONCTIONNEMENT DE LA; Raccordement; FUNCIONAMIENTO DE LA; Conexión de los enchufes; РАБОТА НА ШВЕЙНОЙ; Подключение электропитания
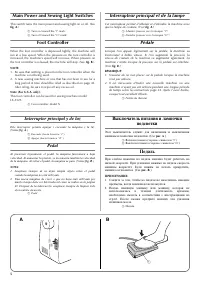
- Página 10 – Main Power and Sewing Light Switches; Foot Controller; Interrupteur principal et de la lampe; Interruptor principal y de luz; Выключатель питания и лампочки
- Página 11 – Inserting the Needle; Checking the Needle; Pour mettre l’aiguille en place; Vérification de l’aiguille; Comprobación de la aguja; Установка иглы; Проверка иглы
- Página 13 – Converting to Free-Arm Style; Steadying the Machine; Modèle bras libre; Pour stabiliser la machine; Para estabilizar la máquina; Переоборудование машины для работы с; Обеспечение устойчивости машины
- Página 17 – ENHEBRADO DE LA MÁQUINA; Bobinado de la canilla; ЗАПРАВКА НИТИ В МАШИНУ; Намотка шпульки
- Página 23 – УСТАНОВКА ДВОЙНОЙ ИГЛЫ; ЗАПРАВКА ДВОЙНОЙ ИГЛЫ НИТЬЮ
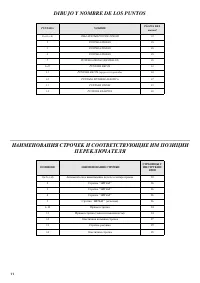
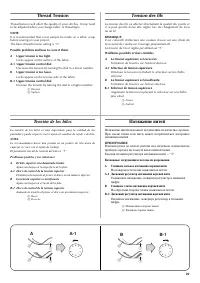
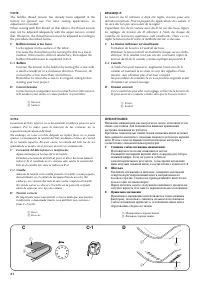
- Página 24 – Thread Tension; Tension des fils; Tensión de los hilos; Натяжение нитей; Возможные затруднения и методы их разрешения.; A-1 Дисковый регулятор натяжения верхней нити; B-1 Дисковый регулятор натяжения верхней нити
- Página 25 – Слишком слабое натяжение нижней нити.
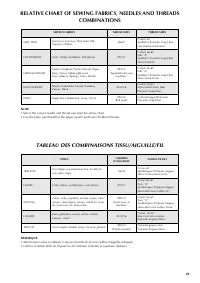
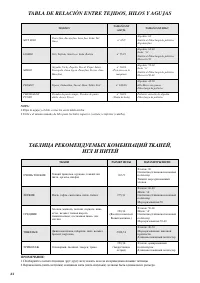
- Página 27 – TABLA DE RELACIÓN ENTRE TEJIDOS, HILOS Y AGUJAS; ТАБЛИЦА РЕКОМЕНДУЕМЫХ КОМБИНАЦИЙ ТКАНЕЙ,
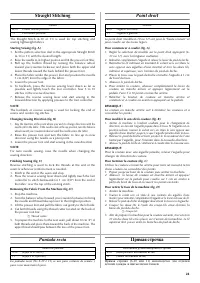
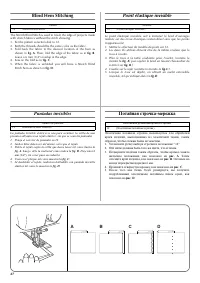
- Página 31 – Blind Hem Stitching; Point élastique invisible; Puntadas invisibles; Потайная строчка-мережка
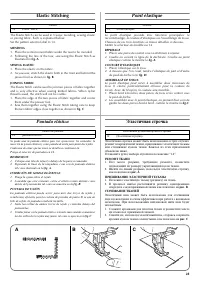
- Página 32 – Elastic Stitching; MENDING; SEWING ELASTIC; JOINING FABRIC; Point élastique; Puntada elástica; Эластичная строчка; РЕМОНТ ТКАНИ; ПРИШИВАНИЕ ЭЛАСТИЧНОЙ ТЕСЬМЫ; СТАЧИВАНИЕ ТКАНЕЙ
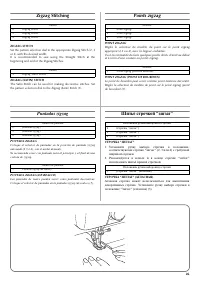
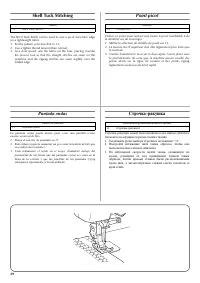
- Página 33 – Shell Tuck Stitching; Point picot; Puntada ondas
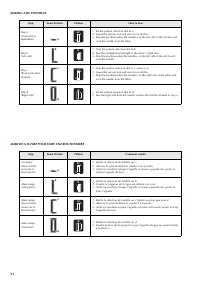
- Página 34 – Making a Buttonhole; MAKING A BUTTONHOLE; Création d’une boutonnière; Para coser ojales; Выметывание петель
- Página 36 – ВЫПОЛНЕНИЕ ВЫМЕТЫВАНИЯ ПЕТЕЛЬ
- Página 37 – ЗАКРЕПЛЕНИЕ СТРОЧКИ И ПРОРЕЗКА ПЕТЛИ
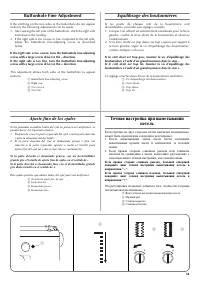
- Página 38 – Buttonhole Fine Adjustment; Equilibrage des boutonnières; Ajuste fino de los ojales; Точная настройка при выметывании
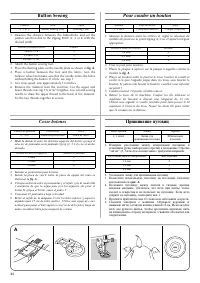
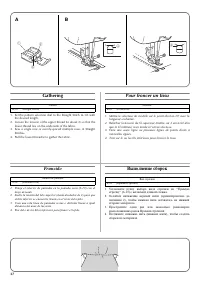
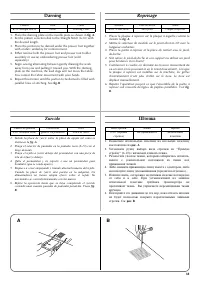
- Página 39 – Button Sewing; Pour coudre un bouton; Coser botones; Пришивание пуговиц
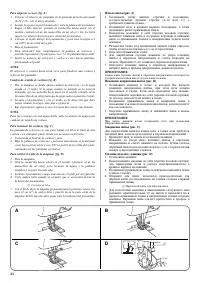
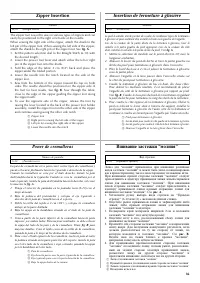
- Página 40 – Zipper Insertion; Insertion de fermeture à glissière; Poner de cremalleras; Вшивание застежки “молния”
- Página 41 – Gathering; Pour froncer un tissu; Fruncido; Выполнение сборок
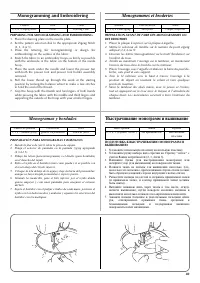
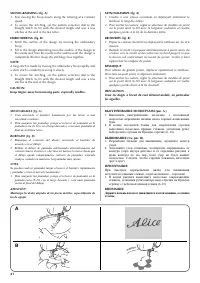
- Página 44 – Monogramming and Embroidering; PREPARING FOR MONOGRAMMING AND EMBROIDERING; Monogrammes et broderies; Monogramas y bordados; Выстрачивание монограмм и вышивание
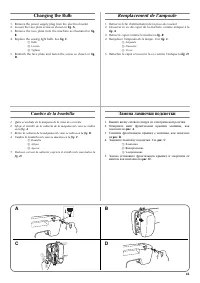
- Página 46 – Changing the Bulb; Remplacement de l’ampoule; Cambio de la bombilla; Замена лампочки подсветки
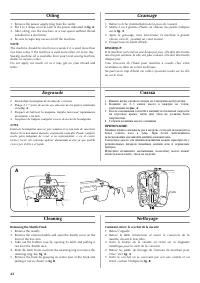
- Página 48 – Cleaning the Shuttle Race; Limpieza; Чистка; Извлечение челнока
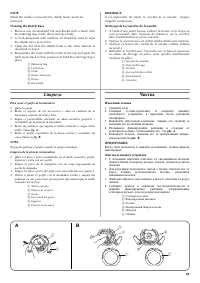
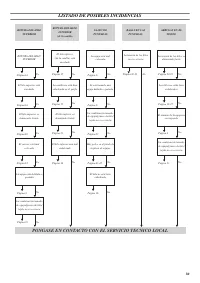
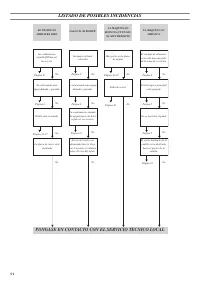
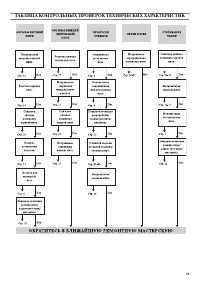
- Página 49 – Cleaning the Feed Dogs; Performance Checklist; Liste de vérification en cas de; Listado de posibles incidencias; Очистка гребенок транспортера; Таблица контрольных проверок
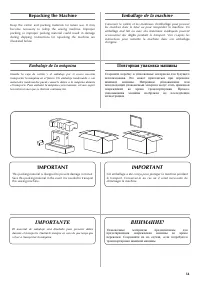
- Página 54 – Repacking the Machine; Emballage de la machine; IMPORTANT; Embalaje de la máquina; IMPORTANTE; Повторная упаковка машины
16
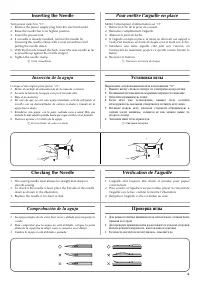
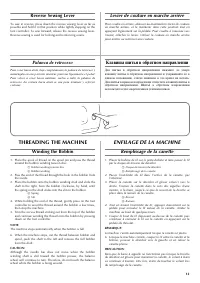
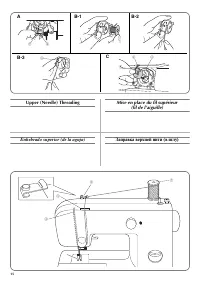
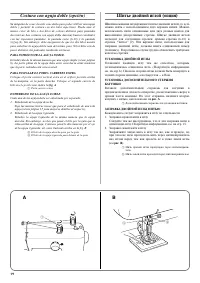
1. Raise the presser foot using the presser foot lifter and turn the
balance wheel toward you (counterclockwise) to raise the
thread take-up lever to its highest position.
2. Pull up the spool pin and place a spool of thread on this pin.
3. Pass the thread through both thread guides: the rear one first,
then the front one. (
fig. A
)
a
Spool pin
b
Thread guide (rear)
c
Thread guide (front)
d
Thread take-up lever
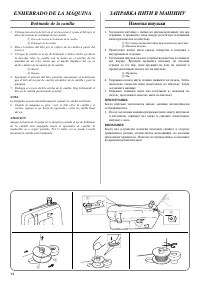
4. Pull the thread down and around the upper tension control
dial from the right to the left so the thread picks up the thread
check spring. (See
fig. B
.) While holding the thread as shown
in
fig. C
, pull it between the tension discs.
e
Upper tension control dial
f
Thread check spring
5. Guide the thread to the back of the thread take-up lever and
around to the left (
fig. D
). Bring the thread through the slit by
pulling it toward you and into the eyelet.
g
Thread take-up lever
6. Bring the thread down and pass it behind the thread guide.
h
Thread guide
7. Thread the needle from front to back and pull out about 5 cm
(2") of thread as shown in
fig. E
.
NOTE:
If the thread is incorrectly fed, the thread may break, cause
stitches to be skipped or cause the fabric to wrinkle.
1. Lever le pied-de-biche à l’aide du levier correspondant et
tourner le volant à main vers soi (dans le sens contraire aux
aiguilles d’une montre) pour remonter complètement le levier
releveur.
2. Lever le porte-bobine et y placer une bobine de fil.
3. Faire passer le fil par les deux guide-fils: d’abord l’arrière puis
l’avant. (
fig. A
)
a
Porte-bobine
b
Guide-fils (arrière)
c
Guide-fils (avant)
d
Levier releveur de fil
4. Tirer le fil vers le bas et le faire passer par le disque de
contrôle de tension supérieure de droite à gauche afin que le
fil attrape le ressort de vérification (voir
fig. B
). Tirer le fil entre
les disques de tension, tout en le tenant comme le montre la
fig. C
.
e
Disque de tension du fil
f
Ressort de vérification du fil
5. Guider le fil vers l’arrière du levier releveur puis autour vers la
gauche (
fig. D
). Amener le fil vers la fente en le tirant vers soi
et le faire passer par le chas.
g
Levier releveur
6. Tirer le fil vers le bas et le faire passer derrière le guide-fils.
h
Guide-fils
7. Enfiler l’aiguille de l’avant vers l’arrière et tirer environ 5 cm
(2") de fil comme le montre la
fig. E
.
REMARQUE:
Si le fil n’est pas installé correctement, il peut se rompre, causer
des sauts de points ou des fronces dans le tissu.
1. Levante el prensatelas con la palanca y gire la ruedecilla hacia
usted (en el sentido contrario al de las manecillas de un reloj)
para subir la palanca tirahilos a su posición más alta.
2. Levante el porta carretes y coloque un carrete en el eje.
3. Pase el hilo a través de ambas guías: la de atrás primero y luego la
de delante. (
fig. A
)
a
Porta carretes
b
Guía hilo (trasera)
c
Guía hilo (delantera)
d
Palanca tirahilos
4. Tire del hilo hacia abajo, pasando por el disco de control de la
tensión superior de derecha a izquierda de tal forma que el hilo
enganche el resorte de comprobación del hilo. (Véase
fig. B
).
Mientras sujeta el hilo tal como indica la
fig. C
, páselo por los
discos de tensión.
e
Disco de tensión del hilo
f
Resorte de comprobación del hilo.
5. Guíe el hilo por detrás de la palanca tirahilos y por la izquierda
(
fig. D
). Lleve el hilo por la ranura, tirándolo hacia usted y
pasándolo por el agujero.
g
Palanca tirahilos
6. Baje el hilo y páselo por detrás de la guía.
h
Guía
7. Enhebre la aguja de delante hacia atrás y saque unos 5 cm (2") de
hilo tal como indica la
fig. E
.
NOTA:
Si el hilo está mal enhebrado, puede romperse, saltar puntadas o
fruncir el tejido.
1. Поднимите рычаг прижимной лапки, пользуясь
соответствующим рычагом, и поверните маховик на себя
(против часовой стрелки), чтобы поднять рычаг
нитепритягивателя в крайнее верхнее положение.
2. Вытяните вверх стержень для катушки и наденьте на него
катушку с нитью.
3. Пропустите нить через оба нитенаправителя: сначала через
задний, а потом через передний. (
рис. A
.)
a
Стержень для установки катушки
b
Нитенаправитель (задний)
c
Нитенаправитель (передний)
d
Рычаг нитепритягивателя
4. Протяните нить вниз и вокруг регулятора натяжения
верхней нити справа налево так, чтобы нить зацепила
ограничительную пружину. (См.
рис. B
.) Придерживая
нить, как показано на
рис. C
, протяните ее между
натяжными дисками.
e
Дисковый регулятор натяжения верхней нити
f
Ограничительная пружина
5. Направьте нить к задней части рычага нитепритягивателя
и далее вокруг него справа налево. Проведите нить через
прорезь, вытянув ее на себя, до попадания ее в ушко
нитепритягивателя (cм.
рис. D
.).
g
Рычаг нитепритягивателя
6. Опустите нить вниз и проведите ее за нитенаправителем.
h
Нитенаправитель
7. Заправьте нить в ушко иголки спереди назад и вытяните
около 5 см нити, как показано на
рис. E
.
ПРИМЕЧАНИЕ:
Если нить заправлена неправильно, она может оборваться, а
также могут пропускаться стежки или морщиться ткань.
"Cargando la instrucción" significa que debes esperar hasta que el archivo se cargue y puedas leerlo en línea. Algunas instrucciones son muy grandes y el tiempo de carga depende de la velocidad de tu conexión a Internet.
Resumen
INDICE Página ELEMENTOS PRINCIPALES ......................................................... 1ELEMENTOS PRINCIPALES ......................................................... 2ACCESORIOS.................................................................................... 3FUNCIONAMIENTO DE LA MÁQUINA...
1 PRINCIPAL PARTS * The illustrations of the sewing machine on the following pages may differ slightly from your machine. PIÉCES PRINCIPALES * Les illustrations représentées aux pages suivantes peuvent différer légèrement de votre machine à coudre. ELEMENTOS PRINCIPALES * Las ilustraciones de la máq...
3 ACCESSORIES a Buttonhole foot “A” (1 pc.) b Zipper foot “I” (1 pc.) c Button sewing foot “M” (1 pc.) d Needle (regular single needle No. 14) e Bobbin (1 pc.) f Darning plate (1 pc.) g Oval screwdriver Parts code for zigzag presser foot: 138135-121Foot controller: XC7359-021 (110/120V Area) XC7438-...
Otros modelos de máquinas de coser Brother
-
 Brother JS-23
-
 Brother LS 2150
-
 Brother LS-1520
-
 Brother LS-2125
-
 Brother SL-7
-
 Brother SM2700
-
 Brother ST4031HD
-
 Brother X-5