Brother LS-3125 - Manual de uso - Página 21


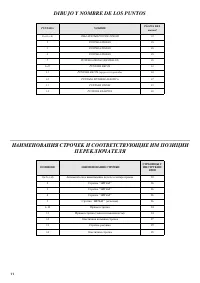


Índice:
- Página 5 – INDICE; СОДЕРЖАНИЕ
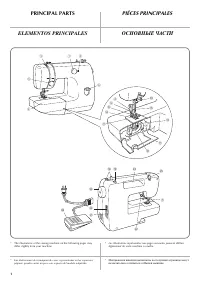
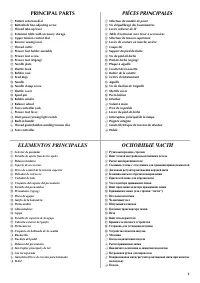
- Página 6 – PRINCIPAL PARTS; PIÉCES PRINCIPALES; ELEMENTOS PRINCIPALES; ОСНОВНЫЕ ЧАСТИ
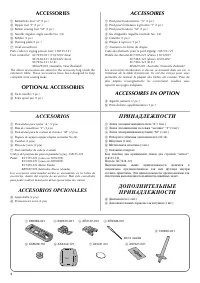
- Página 8 – ACCESSORIES; OPTIONAL ACCESSORIES; ACCESSOIRES; ACCESSOIRES EN OPTION; ACCESORIOS OPCIONALES; ДОПОЛНИТ Е ЛЬНЫ Е
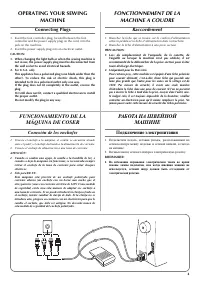
- Página 9 – Connecting Plugs; FONCTIONNEMENT DE LA; Raccordement; FUNCIONAMIENTO DE LA; Conexión de los enchufes; РАБОТА НА ШВЕЙНОЙ; Подключение электропитания
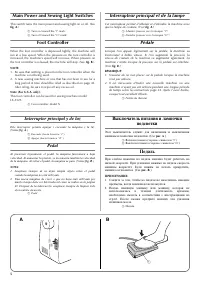
- Página 10 – Main Power and Sewing Light Switches; Foot Controller; Interrupteur principal et de la lampe; Interruptor principal y de luz; Выключатель питания и лампочки
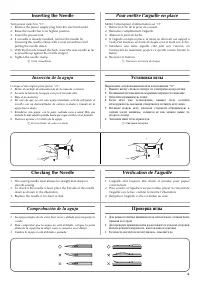
- Página 11 – Inserting the Needle; Checking the Needle; Pour mettre l’aiguille en place; Vérification de l’aiguille; Comprobación de la aguja; Установка иглы; Проверка иглы
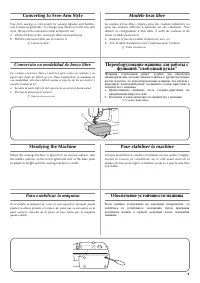
- Página 13 – Converting to Free-Arm Style; Steadying the Machine; Modèle bras libre; Pour stabiliser la machine; Para estabilizar la máquina; Переоборудование машины для работы с; Обеспечение устойчивости машины
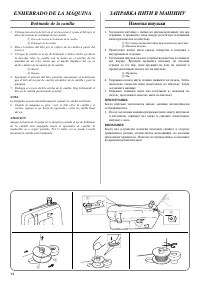
- Página 17 – ENHEBRADO DE LA MÁQUINA; Bobinado de la canilla; ЗАПРАВКА НИТИ В МАШИНУ; Намотка шпульки
- Página 23 – УСТАНОВКА ДВОЙНОЙ ИГЛЫ; ЗАПРАВКА ДВОЙНОЙ ИГЛЫ НИТЬЮ
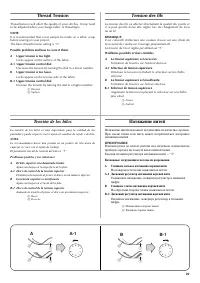
- Página 24 – Thread Tension; Tension des fils; Tensión de los hilos; Натяжение нитей; Возможные затруднения и методы их разрешения.; A-1 Дисковый регулятор натяжения верхней нити; B-1 Дисковый регулятор натяжения верхней нити
- Página 25 – Слишком слабое натяжение нижней нити.
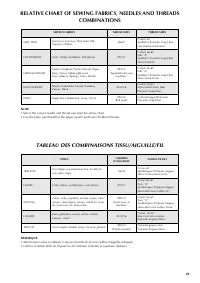
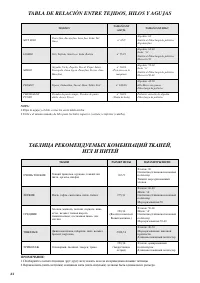
- Página 27 – TABLA DE RELACIÓN ENTRE TEJIDOS, HILOS Y AGUJAS; ТАБЛИЦА РЕКОМЕНДУЕМЫХ КОМБИНАЦИЙ ТКАНЕЙ,
- Página 31 – Blind Hem Stitching; Point élastique invisible; Puntadas invisibles; Потайная строчка-мережка
- Página 32 – Elastic Stitching; MENDING; SEWING ELASTIC; JOINING FABRIC; Point élastique; Puntada elástica; Эластичная строчка; РЕМОНТ ТКАНИ; ПРИШИВАНИЕ ЭЛАСТИЧНОЙ ТЕСЬМЫ; СТАЧИВАНИЕ ТКАНЕЙ
- Página 33 – Shell Tuck Stitching; Point picot; Puntada ondas
- Página 34 – Making a Buttonhole; MAKING A BUTTONHOLE; Création d’une boutonnière; Para coser ojales; Выметывание петель
- Página 36 – ВЫПОЛНЕНИЕ ВЫМЕТЫВАНИЯ ПЕТЕЛЬ
- Página 37 – ЗАКРЕПЛЕНИЕ СТРОЧКИ И ПРОРЕЗКА ПЕТЛИ
- Página 38 – Buttonhole Fine Adjustment; Equilibrage des boutonnières; Ajuste fino de los ojales; Точная настройка при выметывании
- Página 39 – Button Sewing; Pour coudre un bouton; Coser botones; Пришивание пуговиц
- Página 40 – Zipper Insertion; Insertion de fermeture à glissière; Poner de cremalleras; Вшивание застежки “молния”
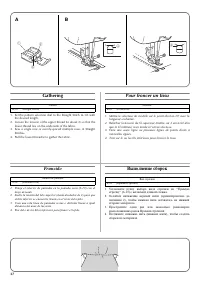
- Página 41 – Gathering; Pour froncer un tissu; Fruncido; Выполнение сборок
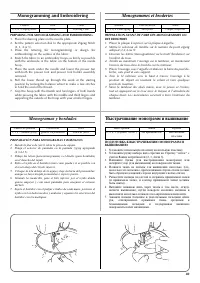
- Página 44 – Monogramming and Embroidering; PREPARING FOR MONOGRAMMING AND EMBROIDERING; Monogrammes et broderies; Monogramas y bordados; Выстрачивание монограмм и вышивание
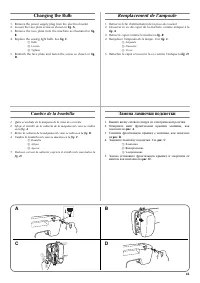
- Página 46 – Changing the Bulb; Remplacement de l’ampoule; Cambio de la bombilla; Замена лампочки подсветки
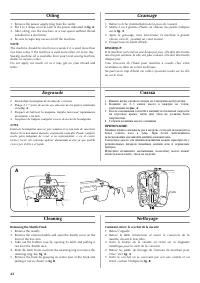
- Página 48 – Cleaning the Shuttle Race; Limpieza; Чистка; Извлечение челнока
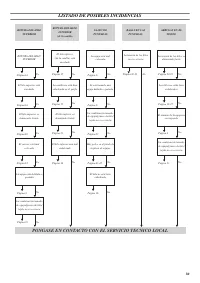
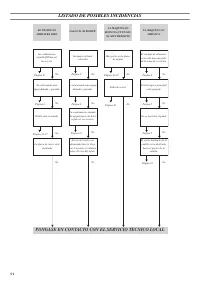
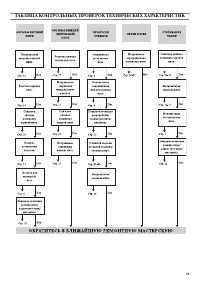
- Página 49 – Cleaning the Feed Dogs; Performance Checklist; Liste de vérification en cas de; Listado de posibles incidencias; Очистка гребенок транспортера; Таблица контрольных проверок
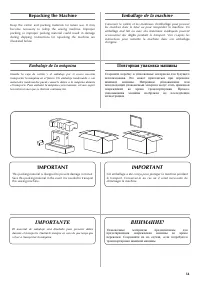
- Página 54 – Repacking the Machine; Emballage de la machine; IMPORTANT; Embalaje de la máquina; IMPORTANTE; Повторная упаковка машины
17
7
7
1
2
3
4
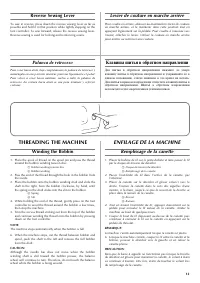
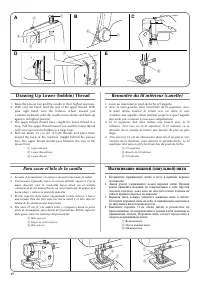
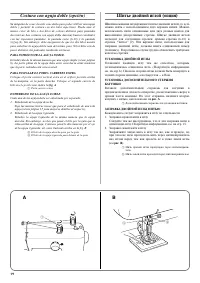
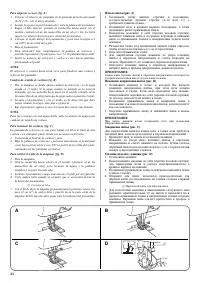
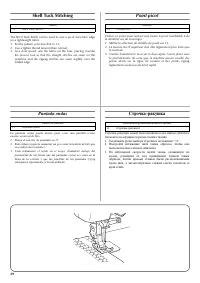
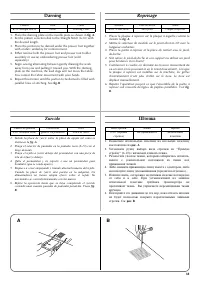
Drawing Up Lower (bobbin) Thread
1. Raise the presser foot and the needle to their highest positions.
2. With your left hand, hold the end of the upper thread. With
your right hand, turn the balance wheel toward you
(counterclockwise) until the needle moves down and back up
again to its highest position.
3. The upper thread should have caught the lower thread in a
loop. Pull the upper thread toward you and the lower thread
will come up from the bobbin in a large loop.
4. Pull out about 15 cm (6") of both threads and place them
toward the back of the machine straight behind the presser
foot. The upper thread should pass between the toes of the
presser foot.
a
Upper thread
b
Lower thread loop
c
Lower thread
Remontée du fil inférieur (canette)
1. Lever au maximum le pied-de-biche et l’aiguille.
2. Avec la main gauche, tenir l’extrémité du fil supérieur. Avec
la main droite, tourner le volant vers soi (dans le sens
contraire aux aiguilles d’une montre) jusqu’à ce que l’aiguille
descende puis remonte à nouveau complètement.
3. Le fil supérieur doit alors former une boucle avec le fil
inférieur. Tirer vers soi le fil supérieur: le fil inférieur va se
dérouler de la canette et former une boucle de plus en plus
large.
4. Tirer environ 15 cm de chacun des deux fils et les placer vers
l’arrière de la machine, juste derrière le pied-de-biche. Le fil
supérieur doit passer entre les branches du pied-de-biche.
a
Fil supérieur
b
Boucle du fil inférieur
c
Fil inférieur
Para sacar el hilo de la canilla
1. Levante el prensatelas y la aguja a sus posiciones más elevadas.
2. Con la mano izquierda, sujete el extremo del hilo superior. Con la
mano derecha, gire la ruedecilla hacia usted (en el sentido
contrario al de las manecillas de un reloj) hasta que la aguja vaya
hacia abajo y suba a su posición más alta.
3. El hilo superior debe haber enganchado el hilo inferior y hacer
una lazada. Tire del hilo superior hacia usted y el hilo inferior
saldrá de la canilla en una baga larga.
4. Tire unos 15 cm (6") de ambos hilos y colóquelos hacia la parte
atrás de la máquina, justo detrás del prensatelas. El hilo superior
debe pasar entre los salientes del prensatelas.
a
Hilo superior
b
Bagas en el hilo inferior
c
Hilo inferior
Вытягивание нижней (шпульной) нити
1. Поднимите прижимную лапку и иглу в крайнее верхнее
положение.
2. Левой рукой удерживайте конец верхней нити. Правой
рукой вращайте маховик по направлению к себе (против
часовой стрелки), пока игла не опустится вниз и вновь не
займет крайнее верхнее положение.
3. Верхняя нить должна захватить нижнюю нить в петлю.
Потяните верхнюю нить на себя, и нижняя нить вытянется
из шпульки в виде большой петли.
4. Вытяните порядка 15 см обеих нитей и разместите их
прямолинейно по направлению к задней части машины за
прижимной лапкой. Верхнюю нить следует пропустить в
прорезь в прижимной лапке.
a
Верхняя нить
b
Петля нижней нити
c
Нижняя нить
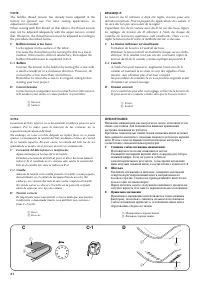
E
C
B
A
D
5
6
8
1
2
1
3
"Cargando la instrucción" significa que debes esperar hasta que el archivo se cargue y puedas leerlo en línea. Algunas instrucciones son muy grandes y el tiempo de carga depende de la velocidad de tu conexión a Internet.
Resumen
INDICE Página ELEMENTOS PRINCIPALES ......................................................... 1ELEMENTOS PRINCIPALES ......................................................... 2ACCESORIOS.................................................................................... 3FUNCIONAMIENTO DE LA MÁQUINA...
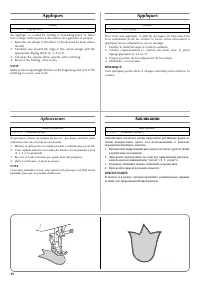
1 PRINCIPAL PARTS * The illustrations of the sewing machine on the following pages may differ slightly from your machine. PIÉCES PRINCIPALES * Les illustrations représentées aux pages suivantes peuvent différer légèrement de votre machine à coudre. ELEMENTOS PRINCIPALES * Las ilustraciones de la máq...
3 ACCESSORIES a Buttonhole foot “A” (1 pc.) b Zipper foot “I” (1 pc.) c Button sewing foot “M” (1 pc.) d Needle (regular single needle No. 14) e Bobbin (1 pc.) f Darning plate (1 pc.) g Oval screwdriver Parts code for zigzag presser foot: 138135-121Foot controller: XC7359-021 (110/120V Area) XC7438-...
Otros modelos de máquinas de coser Brother
-
 Brother JS-23
-
 Brother LS 2150
-
 Brother LS-1520
-
 Brother LS-2125
-
 Brother SL-7
-
 Brother SM2700
-
 Brother ST4031HD
-
 Brother X-5