Brother LS-3125 - Manual de uso - Página 22


Índice:
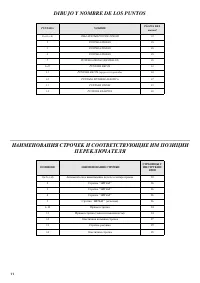
- Página 5 – INDICE; СОДЕРЖАНИЕ
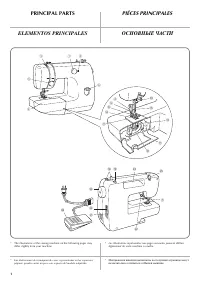
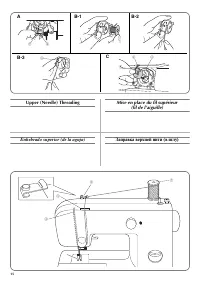
- Página 6 – PRINCIPAL PARTS; PIÉCES PRINCIPALES; ELEMENTOS PRINCIPALES; ОСНОВНЫЕ ЧАСТИ
- Página 8 – ACCESSORIES; OPTIONAL ACCESSORIES; ACCESSOIRES; ACCESSOIRES EN OPTION; ACCESORIOS OPCIONALES; ДОПОЛНИТ Е ЛЬНЫ Е
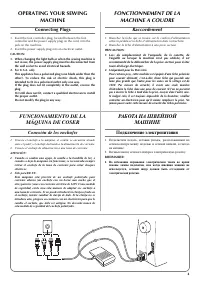
- Página 9 – Connecting Plugs; FONCTIONNEMENT DE LA; Raccordement; FUNCIONAMIENTO DE LA; Conexión de los enchufes; РАБОТА НА ШВЕЙНОЙ; Подключение электропитания
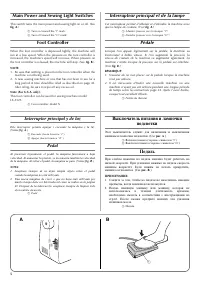
- Página 10 – Main Power and Sewing Light Switches; Foot Controller; Interrupteur principal et de la lampe; Interruptor principal y de luz; Выключатель питания и лампочки
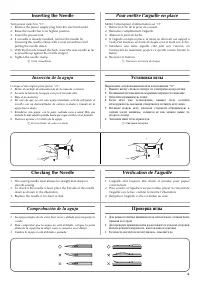
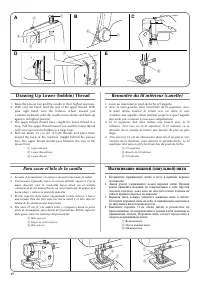
- Página 11 – Inserting the Needle; Checking the Needle; Pour mettre l’aiguille en place; Vérification de l’aiguille; Comprobación de la aguja; Установка иглы; Проверка иглы
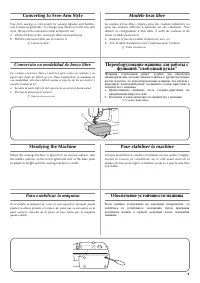
- Página 13 – Converting to Free-Arm Style; Steadying the Machine; Modèle bras libre; Pour stabiliser la machine; Para estabilizar la máquina; Переоборудование машины для работы с; Обеспечение устойчивости машины
- Página 17 – ENHEBRADO DE LA MÁQUINA; Bobinado de la canilla; ЗАПРАВКА НИТИ В МАШИНУ; Намотка шпульки
- Página 23 – УСТАНОВКА ДВОЙНОЙ ИГЛЫ; ЗАПРАВКА ДВОЙНОЙ ИГЛЫ НИТЬЮ
- Página 24 – Thread Tension; Tension des fils; Tensión de los hilos; Натяжение нитей; Возможные затруднения и методы их разрешения.; A-1 Дисковый регулятор натяжения верхней нити; B-1 Дисковый регулятор натяжения верхней нити
- Página 25 – Слишком слабое натяжение нижней нити.
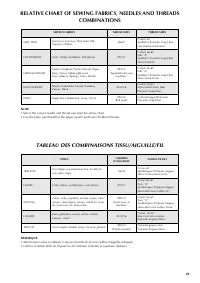
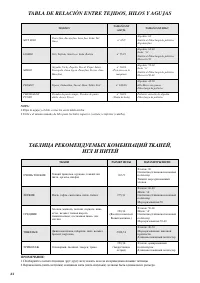
- Página 27 – TABLA DE RELACIÓN ENTRE TEJIDOS, HILOS Y AGUJAS; ТАБЛИЦА РЕКОМЕНДУЕМЫХ КОМБИНАЦИЙ ТКАНЕЙ,
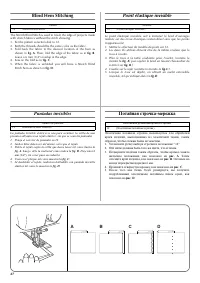
- Página 31 – Blind Hem Stitching; Point élastique invisible; Puntadas invisibles; Потайная строчка-мережка
- Página 32 – Elastic Stitching; MENDING; SEWING ELASTIC; JOINING FABRIC; Point élastique; Puntada elástica; Эластичная строчка; РЕМОНТ ТКАНИ; ПРИШИВАНИЕ ЭЛАСТИЧНОЙ ТЕСЬМЫ; СТАЧИВАНИЕ ТКАНЕЙ
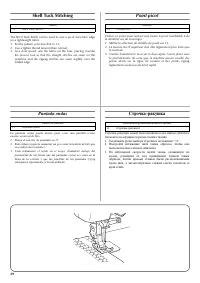
- Página 33 – Shell Tuck Stitching; Point picot; Puntada ondas
- Página 34 – Making a Buttonhole; MAKING A BUTTONHOLE; Création d’une boutonnière; Para coser ojales; Выметывание петель
- Página 36 – ВЫПОЛНЕНИЕ ВЫМЕТЫВАНИЯ ПЕТЕЛЬ
- Página 37 – ЗАКРЕПЛЕНИЕ СТРОЧКИ И ПРОРЕЗКА ПЕТЛИ
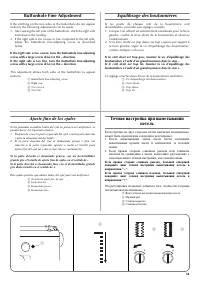
- Página 38 – Buttonhole Fine Adjustment; Equilibrage des boutonnières; Ajuste fino de los ojales; Точная настройка при выметывании
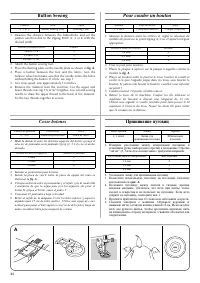
- Página 39 – Button Sewing; Pour coudre un bouton; Coser botones; Пришивание пуговиц
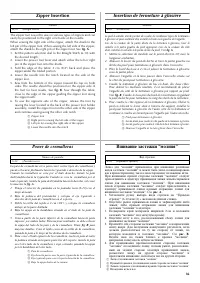
- Página 40 – Zipper Insertion; Insertion de fermeture à glissière; Poner de cremalleras; Вшивание застежки “молния”
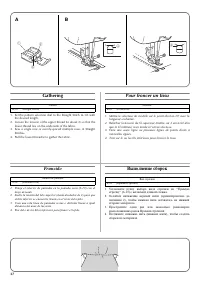
- Página 41 – Gathering; Pour froncer un tissu; Fruncido; Выполнение сборок
- Página 44 – Monogramming and Embroidering; PREPARING FOR MONOGRAMMING AND EMBROIDERING; Monogrammes et broderies; Monogramas y bordados; Выстрачивание монограмм и вышивание
- Página 46 – Changing the Bulb; Remplacement de l’ampoule; Cambio de la bombilla; Замена лампочки подсветки
- Página 48 – Cleaning the Shuttle Race; Limpieza; Чистка; Извлечение челнока
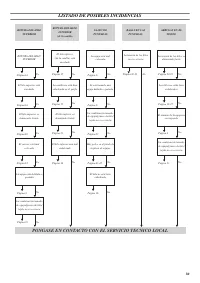
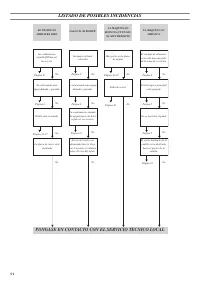
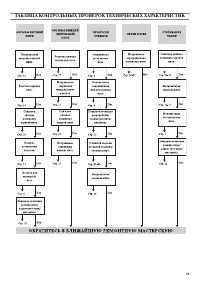
- Página 49 – Cleaning the Feed Dogs; Performance Checklist; Liste de vérification en cas de; Listado de posibles incidencias; Очистка гребенок транспортера; Таблица контрольных проверок
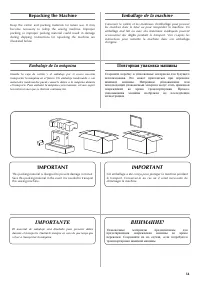
- Página 54 – Repacking the Machine; Emballage de la machine; IMPORTANT; Embalaje de la máquina; IMPORTANTE; Повторная упаковка машины
18
1
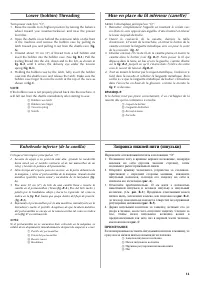
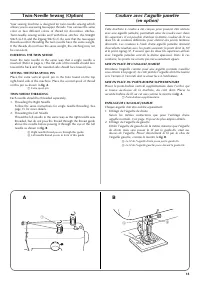
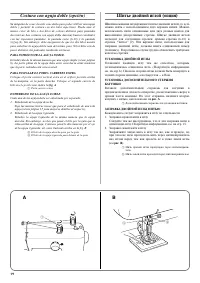
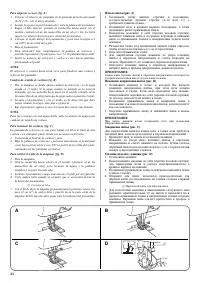
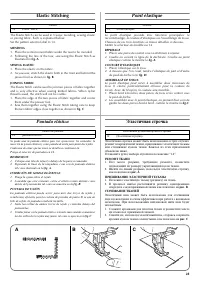
Twin-Needle Sewing (Option)
Your sewing machine is designed for twin-needle sewing which
allows you to sew using two upper threads. You can use the same
color or two different colors of thread for decorative stitches.
Twin-needle sewing works well with these stitches: the Straight
Stitch (6-10)-and the Zigzag Stitch (2). Be sure that the two upper
threads used for threading the twin needle have the same weight.
If the threads do not have the same weight, the stitching may not
be consistent.
INSERTING THE TWIN NEEDLE
Insert the twin needle in the same way that a single needle is
inserted. (Refer to page 6.) The flat side of the needle should face
toward the back and the rounded side should face toward you.
SETTING THE EXTRA SPOOL PIN
Place the extra vertical spool pin in the hole found on the top
right-hand side of the machine. Place the second spool of thread
on this pin as shown in
fig. A
.
a
Extra spool pin
TWIN NEEDLE THREADING
Each needle should be threaded separately.
1. Threading the Right Needle
Follow the same instructions for single needle threading. See
page 15 for more details.
2. Threading the Left Needle
Thread the left needle in the same way as the right needle was
threaded, but do not pass the thread through the thread guide
above the needle before passing it through the eye of the left
needle as shown in
fig. B
.
b
Right needle thread passes through this guide.
c
Left needle thread passes in front of this guide.
Couture avec l’aiguille jumelée
(en option)
Cette machine à coudre a été conçue pour pouvoir être utilisée
avec une aiguille jumelée, permettant ainsi de coudre avec deux
fils supérieurs. Il est possible d’utiliser la même couleur de fil ou
deux fils de couleurs différentes pour obtenir des points fantaisie
décoratifs. Les coutures à l’aide d’une aiguille jumelée donnent
d’excellents résultats avec les points suivants: le point droit (6-10)
et le point zigzag (2). S’assurer que les deux fils supérieurs utilisés
avec l’aiguille jumelée sont de la même épaisseur. Dans le cas
contraire, les points ne seronts pas nécessairement égaux.
MISE EN PLACE DE L’AIGUILLE JUMELEE
Introduire l’aiguille comme pour une aiguille normale (veuillez
vous référer à la page 6). Le côté plat de l’aiguille doit être tourné
vers l’arrière et l’arrondi doit se situer face à l’utilisateur.
MISE EN PLACE DU PORTE-BOBINE SUPPLEMENTAIRE
Placer le porte-bobine vertical supplémentaire dans l’orifice qui
se trouve au-dessus de la machine, du côté droit. Placer la
seconde bobine de fil sur cet axe comme le montre la
fig. A
.
a
Porte-bobine supplémentaire
ENFILAGE DE L’AIGUILLE JUMELEE
Chaque aiguille doit être enfilée séparément.
1. Enfilage de l’aiguille de droite
Suivre les mêmes instructions que pour l’enfilage d’une
aiguille normale. Voir page 15 pour de plus amples détails.
2. Enfilage de l’aiguille de gauche
Enfiler l’aiguille de gauche de la même manière que l’aiguille
de droite mais sans passer le fil par le guide-fils situé au-
dessus de l’aiguille. Passer directement le fil par le chas de
l’aiguille gauche, comme le montre la
fig. B
.
b
Le fil de l’aiguille droite passe par le guide-fils.
c
Le fil de l’aiguille gauche passe devant le guide-fils.
A
B
2
3
"Cargando la instrucción" significa que debes esperar hasta que el archivo se cargue y puedas leerlo en línea. Algunas instrucciones son muy grandes y el tiempo de carga depende de la velocidad de tu conexión a Internet.
Resumen
INDICE Página ELEMENTOS PRINCIPALES ......................................................... 1ELEMENTOS PRINCIPALES ......................................................... 2ACCESORIOS.................................................................................... 3FUNCIONAMIENTO DE LA MÁQUINA...
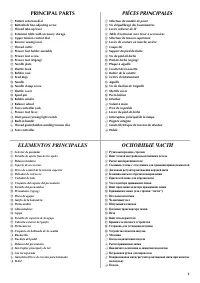
1 PRINCIPAL PARTS * The illustrations of the sewing machine on the following pages may differ slightly from your machine. PIÉCES PRINCIPALES * Les illustrations représentées aux pages suivantes peuvent différer légèrement de votre machine à coudre. ELEMENTOS PRINCIPALES * Las ilustraciones de la máq...
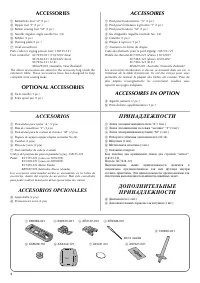
3 ACCESSORIES a Buttonhole foot “A” (1 pc.) b Zipper foot “I” (1 pc.) c Button sewing foot “M” (1 pc.) d Needle (regular single needle No. 14) e Bobbin (1 pc.) f Darning plate (1 pc.) g Oval screwdriver Parts code for zigzag presser foot: 138135-121Foot controller: XC7359-021 (110/120V Area) XC7438-...
Otros modelos de máquinas de coser Brother
-
 Brother JS-23
-
 Brother LS 2150
-
 Brother LS-1520
-
 Brother LS-2125
-
 Brother SL-7
-
 Brother SM2700
-
 Brother ST4031HD
-
 Brother X-5