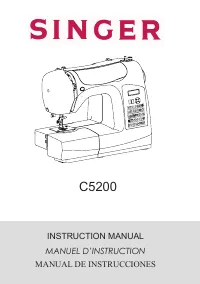
Singer C5200 - Manual de uso - Página 38


Índice:
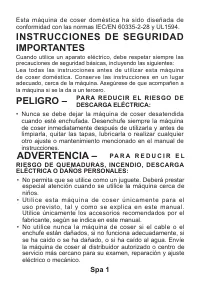
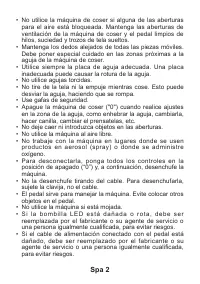
- Página 2 – Cuando utilice un aparato eléctrico, debe respetar siempre las; PELIGRO –; ADVERTENCIA –; PA R A R E D U C I R E L R I E S G O D E; de coser inmediatamente después de utilizarla y antes de; RIESGO DE QUEMADURAS, INCENDIO, DESCARGA; la máquina de coser al distribuidor autorizado o centro de
- Página 4 – GUARDE ESTAS INSTRUCCIONES; PARA EUROPA SOLAMENTE:
- Página 5 – amplios conocimientos del sistema y sólo debe ser realizado; SINGER es una marca registrada de; Recuerde que este producto se debe reciclar de un modo seguro en
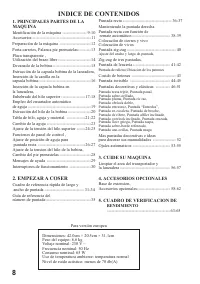
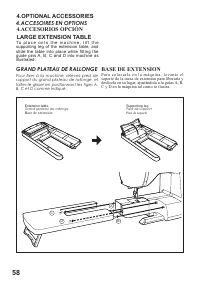
- Página 6 – INDICE DE CONTENIDOS; ACCESORIOS OPCIONALES; RENDIMIENTO
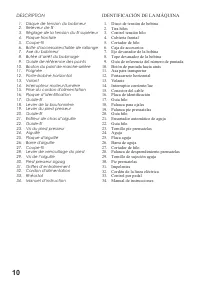
- Página 7 – DESCRIPTION; IDENTIFICACIÓN DE LA MÁQUINA
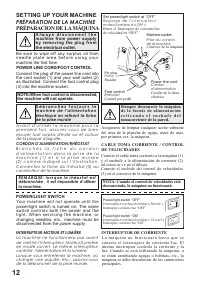
- Página 9 – FOOT CONTROL; machine the first time.; the machine will not operate.; PRÉPARACION DE LA MÁQUINA; PRÉPARATION DE LA MACHINE; SETTING UP YOUR MACHINE; A l w a y s d i s c o n n e c t t h e; Connect the plug of the power line cord into
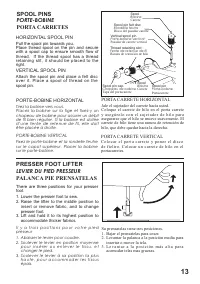
- Página 10 – SPOOL PINS; with a spool cap to ensure smooth flow of; PORTE-BOBINE HORIZONTAL; PORTE-BOBINE VERTICAL; PORTA CARRETE VERTICAL; PRESSER FOOT LIFTER; Lift and hold it to its highest position to; LEVIER DU PIED PRESSEUR; PALANCA PIE PRENSATELAS
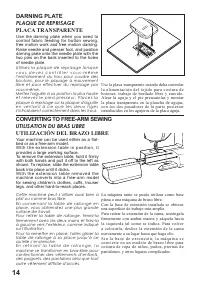
- Página 11 – CONVERTING TO FREE-ARM SEWING; UTILISATION DU BRAS LIBRE; UTILIZACIÓN DEL BRAZO LIBRE; PLAQUE DE REPRISAGE; PLACA TRANSPARENTE
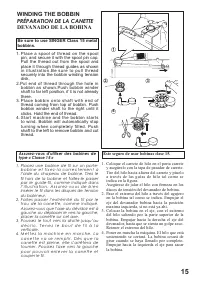
- Página 12 – WINDING THE BOBBIN; Be sure to use SINGER Class 15 metal; type « Classe 15 »; Este seguro de usar bobinas clase 15.; PRÉPARATION DE LA CANETTE; DEVANADO DE LA BOBINA
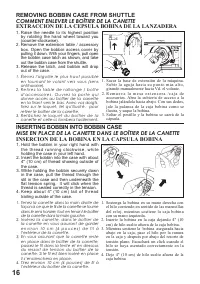
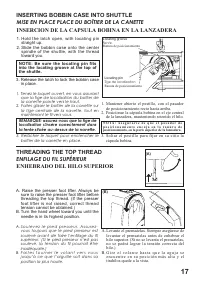
- Página 13 – REMOVING BOBBIN CASE FROM SHUTTLE; COMMENT ENLEVER LE BOÎTIER DE LA CANETTE; EXTRACCION DE LA CEPSULA BOBINA DE LA LANZADERA; MISE EN PLACE DE LA CANETTE DANS LE BOÎTIER DE LA CANETTE; INSERCION DE LA BOBINA EN LA CAPSULA BOBINA; façon à ce que le fil de la canette se tourne
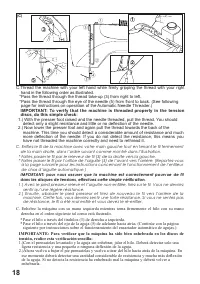
- Página 15 – To verify that the machine is threaded properly in the tension; sentir qu’une légère résistance.; derecha en el orden siguiente tal como está ilustrado.; tensión, realice esta verificación sencilla:; ligera resistencia y una pequeña o ninguna deflexión de la aguja.
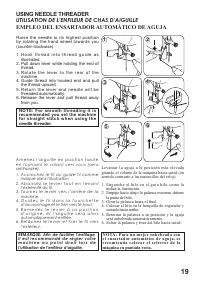
- Página 16 – N O T E : F o r s m o o t h t h r e a d i n g i t i s; USING NEEDLE THREADER; Raise the needle to its highest position; i l e s t r e c o m m a n d é d e r é g l e r v o t r e; NOTA: Para un mejor enhebrado con; UTILISATION DE L’ENFILEUR DE CHAS D’AIGUILLE; G u i d e z l e f i l d a n s l a f o u r c h e t t e; EMPLEO DEL ENSARTADOR AUTOMÁTICO DE AGUJA
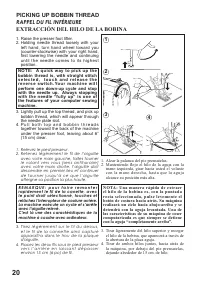
- Página 17 – s e l e c t e d , t o u c h a n d r e l e a s e t h e; PICKING UP BOBBIN THREAD; RAPPEL DU FIL INFÉRIEURE; EXTRACCIÓN DEL HILO DE LA BOBINA; first lowering the needle and continuing; avec votre main droite, l’aiguille doit; Lightly pull up the top thread, and pick up; apparaîtra dans le trou de la plaque
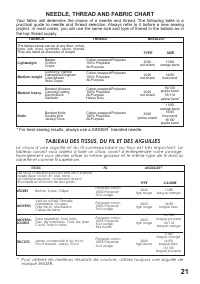
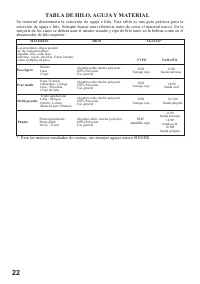
- Página 19 – abastecedor de hilo superior.; TABLA DE HILO, AGUJA Y MATERIAL
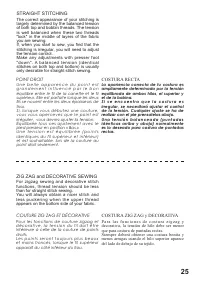
- Página 22 – ZIG ZAG and DECORATIVE SEWING; COUTURE ZIG ZAG ET DÉCORATIVE; COSTURA ZIG ZAG y DECORATIVA; For zigzag sewing and decorative stitch; STRAIGHT STITCHING; POINT DROIT; COSTURA RECTA
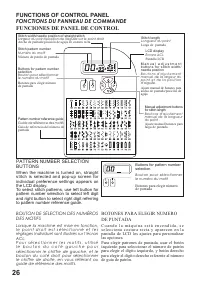
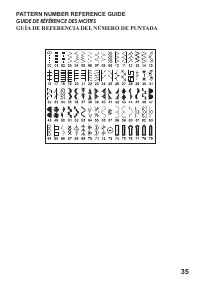
- Página 23 – FUNCTIONS OF CONTROL PANEL; PATTERN NUMBER SELECTION; FONCTIONS DU PANNEAU DE COMMANDE; FUNCIONES DE PANEL DE CONTROL; BOUTON DE SÉLECTION DES NUMÉROS; BOTONES PARA ELEGIR NUMERO; Lorsque la machine est mise en fonction,
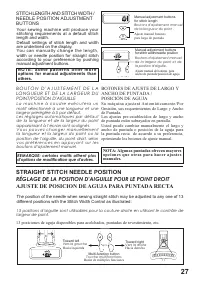
- Página 24 – de la longueur et de la largeur du point; NOTA: Algunas puntadas ofrecen mayores; STITCH LENGTH AND STITCH WIDTH /; B O U T O N D ' A J U S T E M E N T D E L A; BOTONES DE AJUSTE DE LARGO Y; STRAIGHT STITCH NEEDLE POSITION; RÉGLAGE DE LA POSITION D'AIGUILLE POUR LE POINT DROIT; AJUSTE DE POSICION DE AGUJA PARA PUNTADA RECTA
- Página 25 – it once. Correct bobbin tension will result in the; ADJUSTING BOBBIN THREAD TENSION; RÉGLAGE DE LA TENSION DU FIL INFÉRIEUR; AJUSTE DE LA TENSION DEL HILO DE LA BOBINA; Lower the presser foot lifter so that the foot; REMPLACEMENT DU PIED PRESSEUR; CAMBIO DEL PIE PRENSATELAS
- Página 26 – HELPFUL MESSAGES; MESSAGES D’AIDE; MENSAJES DE AYUDA
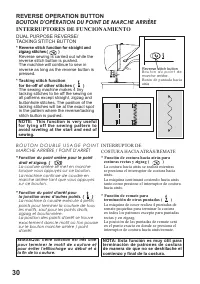
- Página 27 – DUAL PURPOSE REVERSE/; The sewing machine makes 4 tiny; REVERSE OPERATION BUTTON; BOUTON D'OPÉRATION DU POINT DE MARCHE ARRIÈRE; INTERRUPTORES DE FUNCIONAMIENTO; B O U T O N D O U B L E U S A G E P O I N T; INTERRUPTOR DE; * Fonction du point arrière pour le point; * Función de remate para; REMARQUE: cette fonction est très utile; de manera de que no se deshilache el
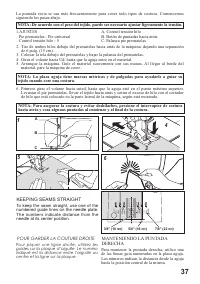
- Página 30 – tejido cuando cose una costura.; To keep the seam straight, use one of the; Pour piquer une ligne droite, utilisez les; KEEPING SEAMS STRAIGHT; POUR GARDER LA COUTURE DROITE; MANTENIENDO LA PUNTADA
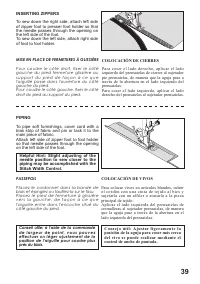
- Página 32 – INSERTING ZIPPERS; of zipper foot to presser foot holder so that; PIPING; Attach left side of zipper foot to foot holder; Helpful Hint: Slight adjusting of the; l'aiguille passe dans l'ouverture du côté
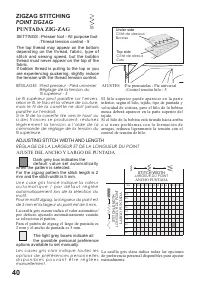
- Página 33 – For the zigzag pattern the stitch length is 2; ADJUSTING STITCH WIDTH AND LENGTH; RÉGLAGE DE LA LARGEUR ET DE LA LONGUEUR DU POINT; AJUSTE DEL ANCHO Y LARGO DE; ZIGZAG STITCHING; POINT ZIGZAG
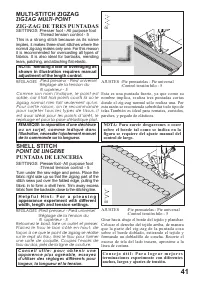
- Página 34 – H e l p f u l H i n t : F o r a p l e a s i n g; solide, car il fait trois points courts là où le; C o n s e j o ú t i l : P a r a l o g r a r m e j o r e s; ZIG-ZAG DE TRES PUNTADAS; POINT DE LINGERIE; PUNTADA DE LENCERIA
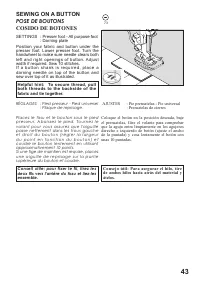
- Página 36 – SEWING ON A BUTTON; d u p o i n t e n f o n c t i o n d u b o u t o n ) e t; Consejo útil: Para asegurar el hilo, tire; POSE DE BOUTONS; COSIDO DE BOTONES
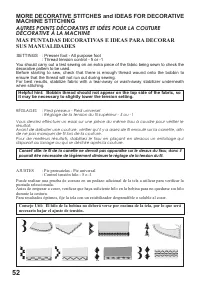
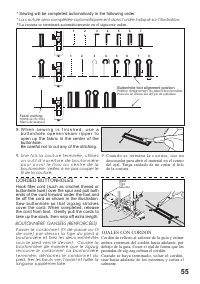
- Página 37 – surjetez le rebord coupé.; movimiento de la aguja, ensanchando o alargando la puntada.; faites un essai de couture.; Now fold the fabric as illustrated with the wrong side up.
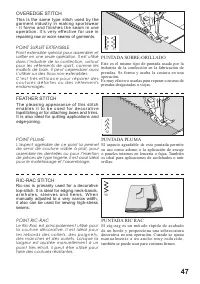
- Página 39 – OVEREDGE STITCH; POINT SURJET EXTENSIBLE; PUNTADA SOBRE-ORILLADO; POINT PLUME; PUNTADA PLUMA
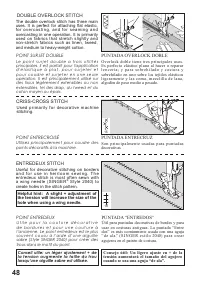
- Página 40 – la tension augmente la taille du trou; Consejo útil: Un ligero ajuste en + de la; PUNTADA ENTRECRUZ; POINT ENTREDEUX; PUNTADA “ENTREDOS”; uses. It is perfect for attaching flat elastic,; DOUBLE OVERLOCK STITCH; POINT SURJET DOUBLE; PUNTADA OVERLOCK DOBLE
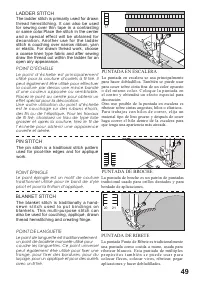
- Página 41 – PIN STITCH; POINT ÉPINGLE; PUNTADA DE BROCHE; POINT DE LANGUETTE; PUNTADA DE RIBETE; POINT D’ÉCHELLE; PUNTADA EN ESCALERA
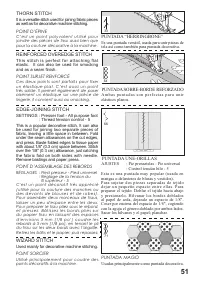
- Página 43 – and as a seam finish.; pour la couture décorative à la machine.; THORN STITCH; POINT D’ÉPINE; PUNTADA “HERRINGBONE”; POINT SURJET RENFORCÉ; REFORZADO; POINT D’ASSEMBLAGE DES REBORDS; WIZARD STITCH; POINT SORCIER
- Página 44 – it may be necessary to slightly lower the tension setting.; de ne pas manquer de fil lors de la couture.; puntada seleccionada.; necesario bajar el ajuste de tensión.; MORE DECORATIVE STITCHES and IDEAS FOR DECORATIVE; AUTRES POINTS DÉCORATIFS ET IDÉES POUR LA COUTURE; MAS PUNTADAS DECORATIVAS E IDEAS PARA DECORAR; SETTINGS; RÉGLAGES; AJUSTES
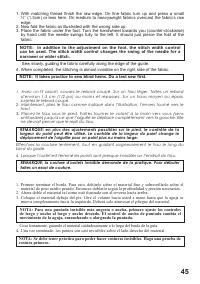
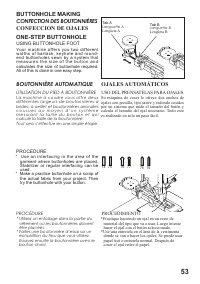
- Página 45 – La machine à coudre vous offre deux; BUTTONHOLE MAKING; CONFECTION DES BOUTONNIÈRES; CONFECCION DE OJALES; BOUTONNIÈRE AUTOMATIQUE; OJALES AUTOMÁTICOS; USING BUTTONHOLE FOOT; UTILISATION DU PIED À BOUTONNIÈRE; USO DEL PRENSATELAS PARA OJALES; PROCÉDURE; PROCEDIMIENTO; Stabilizer or regular interfacing can be
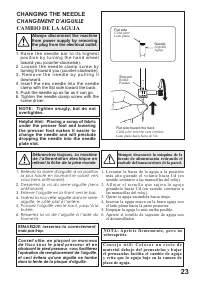
- Página 46 – buttonhole foot. (Refer to “Changing
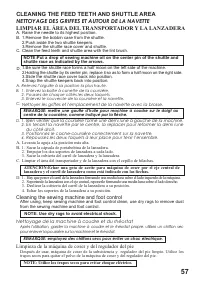
- Página 48 – from the sewing machine and foot control.; NOTE: Use dry rags to avoid electrical shock.; pour enlever la poussière sur la machine et le rhéostat.; NOTE: Utilice los trapos secos para evitar choque eléctrico.; CLEANING THE FEED TEETH AND SHUTTLE AREA; NETTOYAGE DES GRIFFES ET AUTOUR DE LA NAVETTE; LIMPIAR EL ÁREA DEL TRANSPORTADOR Y LA LANZADERA; Remove the bobbin case from the shuttle.; shuttle; Raise the needle to its highest position.; Enlevez la boîte à canette de la coursière.; Positionnez le cache-coursière correctement sur la navette.; centre de la coursière, comme indiqué par la flèche.; Nettoyer les griffes et l'emplacement de la navette avec la brosse.; Cleaning the sewing machine and foot control; Nettoyage de la machine à coudre et du rhéostat; Limpieza de la máquina de coser y del regulador del pie
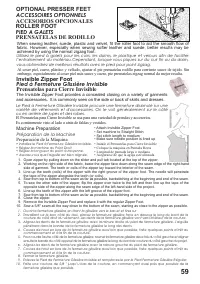
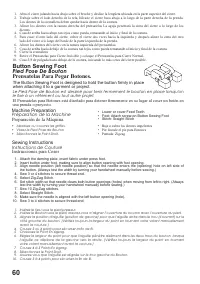
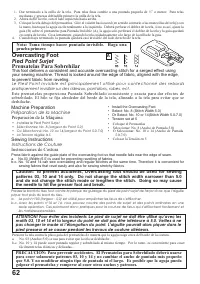
- Página 51 – Button Sewing Foot; Pied Pose De Bouton; Prensatelas Para Pegar Botones.; when attaching it to a garment or project.; le fixe à un vêtement ou tout autre projet.; una prenda o proyecto.; Preparación de la Máquina.; Sewing Instructions; Instructions de Couture; Instrucciones para Coser
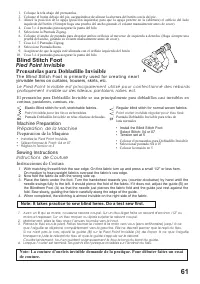
- Página 52 – Blind Stitch Foot; Pied Point Invisible; Prensatelas para Dobladillo Invisible; T h e B l i n d S t i t c h F o o t i s p r i m a r i l y u s e d f o r c r e a t i n g n e a r l; Préparation de la Machine; Peeparacion de la Maquina; Instructions de Couture; Instrucciones de Costura; Note: It takes practice to sew blind hems. Do a test sew first.
- Página 53 – Nota: Toma tiempo hacer puntada invisible. Haga una; Overcasting Foot; Pied Point Surjet; Prensatelas Para Sobrehilar; to prevent fabric from raveling.
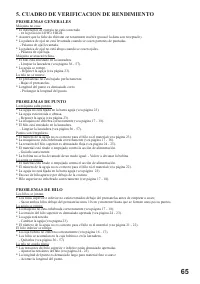
- Página 54 – CUADRO DE VERIFICACION DE RENDIMIENTO; PROBLEMAS GENERALES
46
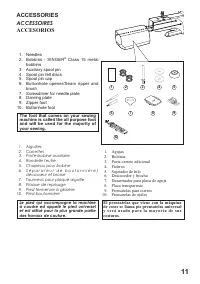
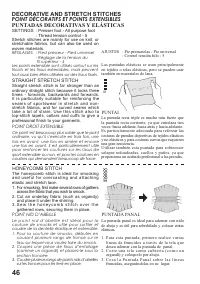
1. For smocking, first make several rows of gathers
across the fabric that you wish to smock.
2. Cut an underlay fabric (such as organdy)
and place it under the shirring.
3. S e w t h e h o n e y c o m b s t i t c h o v e r t h e
gathered rows, securing them in place.
Ce point est beaucoup plus solide que le point
ordinaire, vu qu’il s’exécute en trois fois, une
fois en avant, une fois en arrière et encore
une fois en avant. Il est particulièrement utile
pour renforcer les coutures sur les tissus de
sport extensible ou non, et pour les coutures en
courbes qui demandent beaucoup de force.
La puntada recta triple es mucho más fuerte que
la puntada recta corriente, ya que entrelaza tres
veces–hacia adelante, hacia atrás y hacia adelante.
Es particularmente adecuada para reforzar las
costuras de prendas deportivas de tejidos elásticos
y no elásticos y para costuras curvas que requieren
una gran resistencia.
Utilizar también esta puntada para sobrecoser
solapas redondeadas, cuellos y puños, ya que
proporciona un acabado profesional a las prendas.
1. Pour la couture de smocks, débuter en
cousant plusieurs rangs de fronce sur le
tissu sur lequel vous voulez faire du smock.
2. Coupez une pièce de tissus d’entoilage
(comme un organdi) et placez-le sous la
section froncée.
3. Coudre plusieurs rangs de points nids d’abeilles
sur les fronces pour les tenir en place.
1. Para esta puntada, primero realice varias
líneas de fruncidos a través de la tela que
desea adornar con la puntada de panal.
2. C o r t e u n a t e l a c o m o c u b i e r t a ( c o m o u n
organdí) y colóquelo por abajo.
3. C o s a l a P u n t a d a P a n a l s o b r e l a s l í n e a s
fruncidas, asegurándolas en su lugar.
Straight stretch stitch is far stronger than an
ordinary straight stitch because it locks three
times - forwards, backwards and forwards.
It is particularly suitable for reinforcing the
seams of sportswear in stretch and non-
stretch fabrics, and for curved seams which
take a lot of strain. Use this stitch also to
top-stitch lapels, collars and cuffs to give a
professional finish to your garments.
STRAIGHT STRETCH STITCH
POINT DROIT EXTENSIBLE
PUNTADA RECTA TRIPLE
HONEYCOMB STITCH
POINT NID D’ABEILLE
PUNTADA PANAL
The honeycomb stitch is ideal for smocking
and useful for overcasting and attaching
elastic and stretch lace.
L e p o i n t n i d d ’ a b e i l l e e s t i d é a l p o u r l a
couture de smocks et utile pour surfiler et
coudre de la dentelle élastique et extensible.
La puntada panal es ideal para adornar con nido
de abeja y es útil para sobrehilado y colocar cintas
elásticas.
01
Las puntadas elásticas se usan principalmente
en tejidos o telas elásticas, pero se pueden usar
también en materiales de lana.
DECORATIVE AND STRETCH STITCHES
POINT DÉCORATIFS ET POINTS EXTENSIBLES
PUNTADAS DECORATIVAS Y ELÁSTICAS
: Presser foot - All purpose foot
: Thread tension control - 5
: Pied presseur - Pied universel
: Réglage de la tension du
fil supérieur - 5
: Pie prensatelas - Pie universal
: Control tensión hilo - 5
SETTINGS
RÉGLAGES
AJUSTES
Stretch stitches are mainly for use on knit, or
stretchable fabrics, but can also be used on
woven materials.
Les points extensible sont utilisés surtout sur les
tricots et les tissus extensibles, mais peuvent
tout aussi bien êtres utilisées sur des tissus tissés.
09
"Cargando la instrucción" significa que debes esperar hasta que el archivo se cargue y puedas leerlo en línea. Algunas instrucciones son muy grandes y el tiempo de carga depende de la velocidad de tu conexión a Internet.
Resumen
Spa 1 Esta máquina de coser doméstica ha sido diseñada de conformidad con las normas IEC/EN 60335-2-28 y UL1594. INSTRUCCIONES DE SEGURIDAD IMPORTANTES Cuando utilice un aparato eléctrico, debe respetar siempre las precauciones de seguridad básicas, incluyendo las siguientes: Lea todas las instrucci...
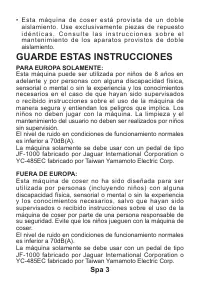
Spa 3 GUARDE ESTAS INSTRUCCIONES PARA EUROPA SOLAMENTE: Esta máquina puede ser utilizada por niños de 8 años en adelante y por personas con alguna discapacidad física, sensorial o mental o sin la experiencia y los conocimientos necesarios en el caso de que hayan sido supervisados o recibido instrucc...
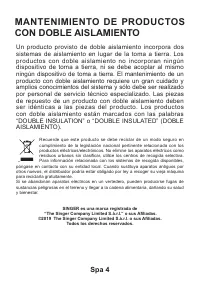
Spa 4 MANTENIMIENTO DE PRODUCTOS CON DOBLE AISLAMIENTO Un producto provisto de doble aislamiento incorpora dos sistemas de aislamiento en lugar de la toma a tierra. Los productos con doble aislamiento no incorporan ningún dispositivo de toma a tierra, ni se debe acoplar al mismo ningún dispositivo d...
Otros modelos de máquinas de coser Singer
-
 Singer 4411CL
-
 Singer 4432CL